ESP8266 - Ultrasonic Sensor
This tutorial instructs you how to use ESP8266 and ultrasonic sensor to measure the distance to obstacles or objects. In detail, we will learn:
- How ultrasonic sensor works
- How to connect the ultrasonic sensor to ESP8266
- How to program ESP8266 to measure distance using the ultrasonic sensor
- How to filter out noise from the distance measurements of the ultrasonic sensor in ESP8266 code
Hardware Preparation
Or you can buy the following kits:
| 1 | × | DIYables Sensor Kit (18 sensors/displays) |
Additionally, some of these links are for products from our own brand, DIYables .
Overview of Ultrasonic Sensor
The HC-SR04 ultrasonic sensor is used to ascertain the distance to an object through the use of ultrasonic waves.
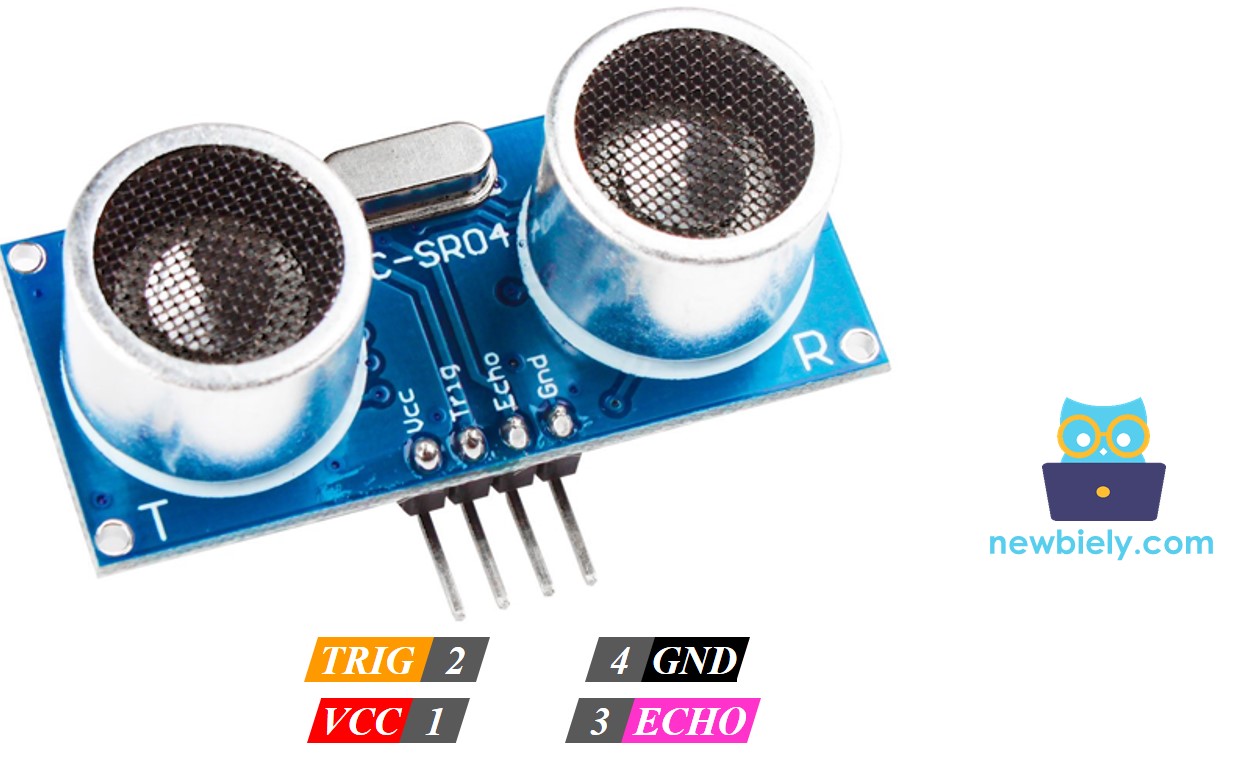
The Ultrasonic Sensor Pinout
The HC-SR04 ultrasonic sensor has four pins:
- VCC pin: must be connected to VCC (5V)
- GND pin: must be connected to GND (0V)
- TRIG pin: this pin is where the control signal (pulse) from ESP8266 is received.
- ECHO pin: this pin sends a signal (pulse) to ESP8266. ESP8266 measures the length of the pulse to calculate the distance.
How It Works
- The micro-controller produces a 10-microsecond pulse on the TRIG pin, which triggers the ultrasonic sensor to emit ultrasonic waves.
- The ultrasonic wave is reflected after hitting an obstacle.
- The ultrasonic sensor then detects the reflected ultrasonic wave and measures its travel time.
- The ultrasonic sensor generates a pulse to the ECHO pin, with the pulse duration being equal to the travel time of the ultrasonic wave.
- The micro-controller measures the pulse duration in the ECHO pin and calculates the distance between the sensor and the obstacle.
How to Get Distance From Ultrasonic Sensor
- To calculate the distance from the ultrasonic sensor, two steps must be taken (1 and 6 on How It Works section):
- Generate a 10-microsecond pulse on the TRIG pin.
- Measure the pulse duration in the ECHO pin.
- Calculate the distance between the sensor and obstacle.
Distance Calculation
We have:
- The travel time of the ultrasonic wave (µs): travel_time = pulse_duration
- The speed of the ultrasonic wave: speed = SPEED_OF_SOUND = 340 m/s = 0.034 cm/µs
So:
- The travel distance of the ultrasonic wave (cm): travel_distance = speed × travel_time = 0.034 × pulse_duration
- The distance between sensor and obstacle (cm): distance = travel_distance / 2 = 0.034 × pulse_duration / 2 = 0.017 × pulse_duration
ESP8266 - Ultrasonic Sensor
We can use two pins of an ESP8266 to measure the distance from an ultrasonic sensor: One pin is connected to the TRIG pin to generate a 10µs pulse, and the other pin is connected to the ECHO pin to measure the pulse from the sensor.
Wiring Diagram
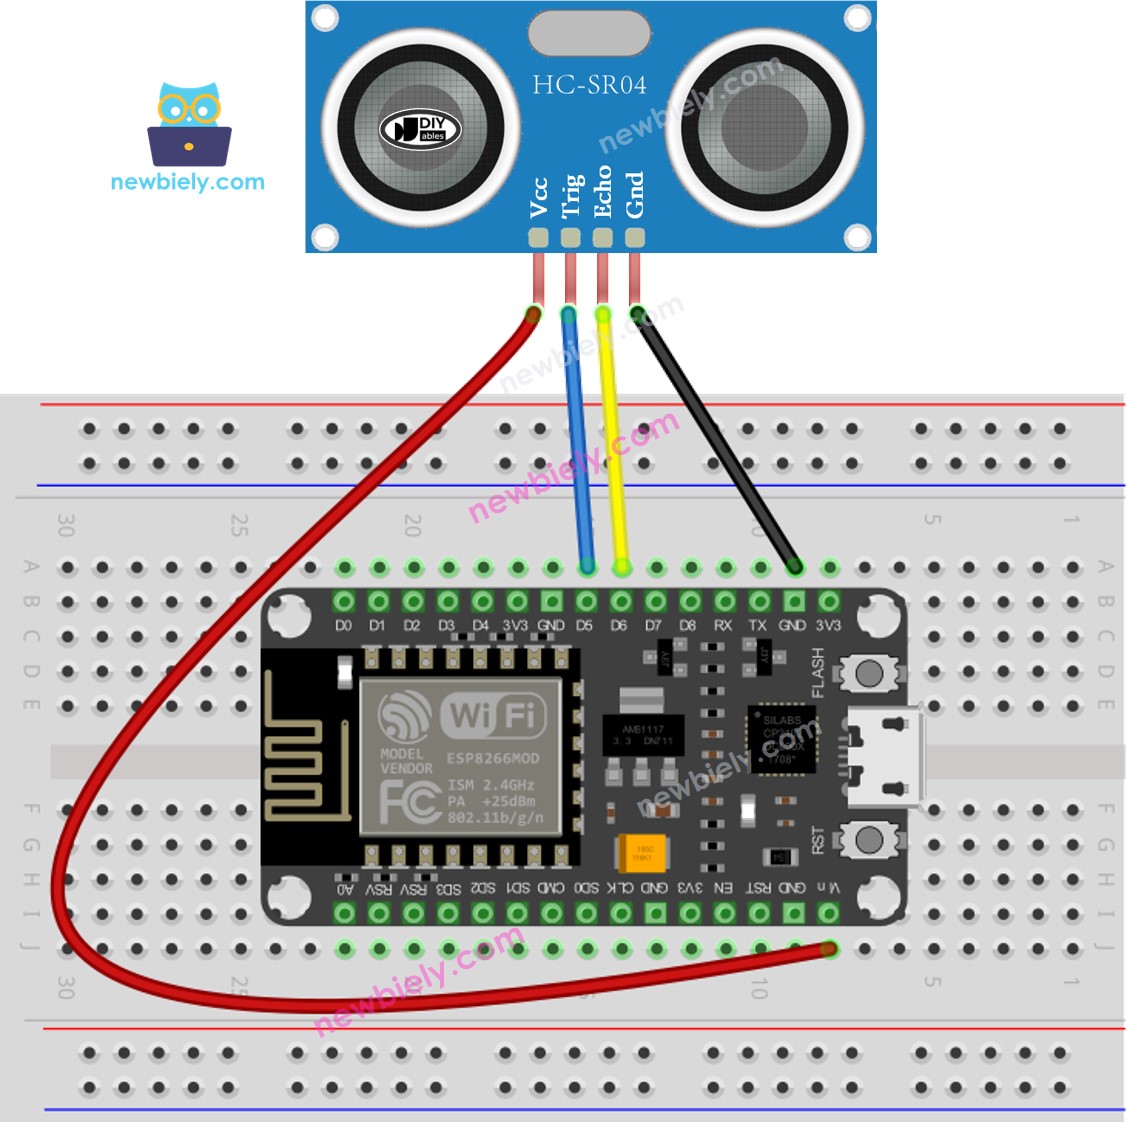
This image is created using Fritzing. Click to enlarge image
See more in ESP8266's pinout and how to supply power to the ESP8266 and other components.
How To Program For Ultrasonic Sensor
- Generate a 10-microsecond pulse on ESP8266's pin D5 by utilizing the digitalWrite() and delayMicroseconds() functions. For example:
- Set the pin to HIGH with digitalWrite(), then delay for 10 microseconds with delayMicroseconds(), then set the pin to LOW with digitalWrite().
- Measure the pulse duration (µs) on Arduino's pin D6 by utilizing the pulseIn() function. For example:
- Calculate the distance (cm):
ESP8266 Code
Detailed Instructions
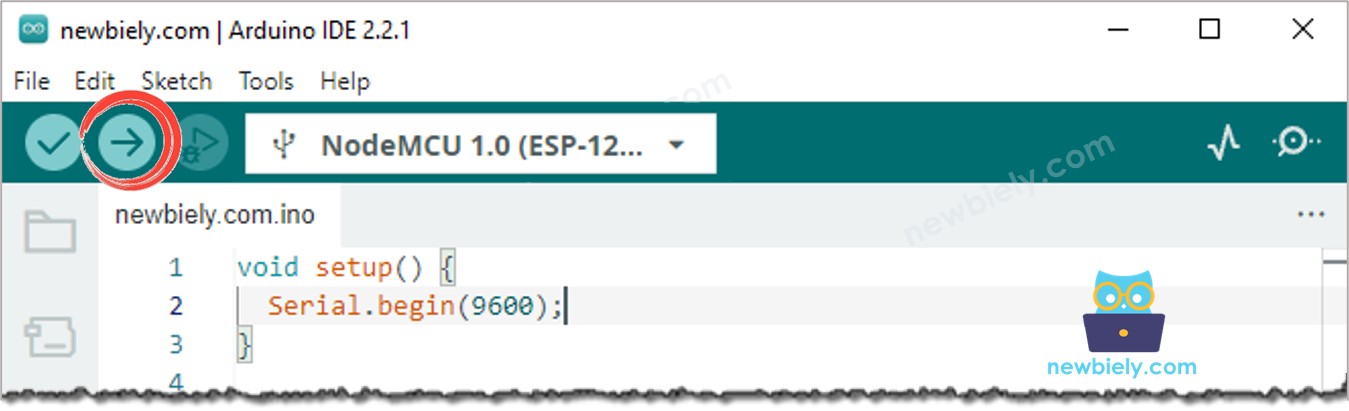
To get started with ESP8266 on Arduino IDE, follow these steps:
- Check out the how to setup environment for ESP8266 on Arduino IDE tutorial if this is your first time using ESP8266.
- Wire the components as shown in the diagram.
- Connect the ESP8266 board to your computer using a USB cable.
- Open Arduino IDE on your computer.
- Choose the correct ESP8266 board, such as (e.g. NodeMCU 1.0 (ESP-12E Module)), and its respective COM port.
- Copy the code and open it in Arduino IDE.
- Click the Upload button on Arduino IDE to compile and upload the code to ESP8266.
- Open the Serial Monitor
- Move your hand in the vicinity of the ultrasonic sensor
- Check out the distance between the sensor and your hand displayed on the Serial Monitor
Code Explanation
Check out the line-by-line explanation contained in the comments of the source code!
How to Filter Noise from Distance Measurements of Ultrasonic Sensor
The measurement result from an ultrasonic sensor may include noise, which can lead to unwanted operations in certain applications. To remove the noise, the following algorithm can be used:
- Take multiple measurements and store them in an array
- Sort the array in ascending order
- Filter out the noise
- Some of the smallest samples are considered as noise → ignore them
- Some of the largest samples are considered as noise → ignore them
- Calculate the average of the middle samples
- The five smallest samples should be disregarded.
- The five largest samples should be disregarded.
- The average of the 10 middle samples (from 5th to 14th) should be taken.
The below example code takes 20 measurements:
Video Tutorial
Challenge Yourself
Employ an ultrasonic sensor for any of the following projects:
- Construct a collision avoidance system for a remote-controlled car.
- Estimate the fullness of a dustbin.
- Monitor the level of a dustbin.
- Automate the opening and closing of a dustbin. Hint: See ESP8266 - Servo Motor.
Ultrasonic Sensor Applications
- Prevention of Collisions
- Estimation of Capacity
- Estimation of Height
- Identification of Nearby Objects