ESP8266 - MQ3 Alcohol Sensor
This tutorial explains how to interface ESP8266 with the MQ3 alcohol sensor for measuring ethanol and alcohol vapor in the environment. The MQ3 sensor proves valuable in breath testing devices, alcohol detection alarms, and air quality monitoring applications.
In this guide, we will cover:
- Wiring the MQ3 alcohol sensor module to ESP8266
- Programming ESP8266 to read alcohol concentration data
Hardware Preparation
Or you can buy the following kits:
| 1 | × | DIYables Sensor Kit (18 sensors/displays) |
Additionally, some of these links are for products from our own brand, DIYables .
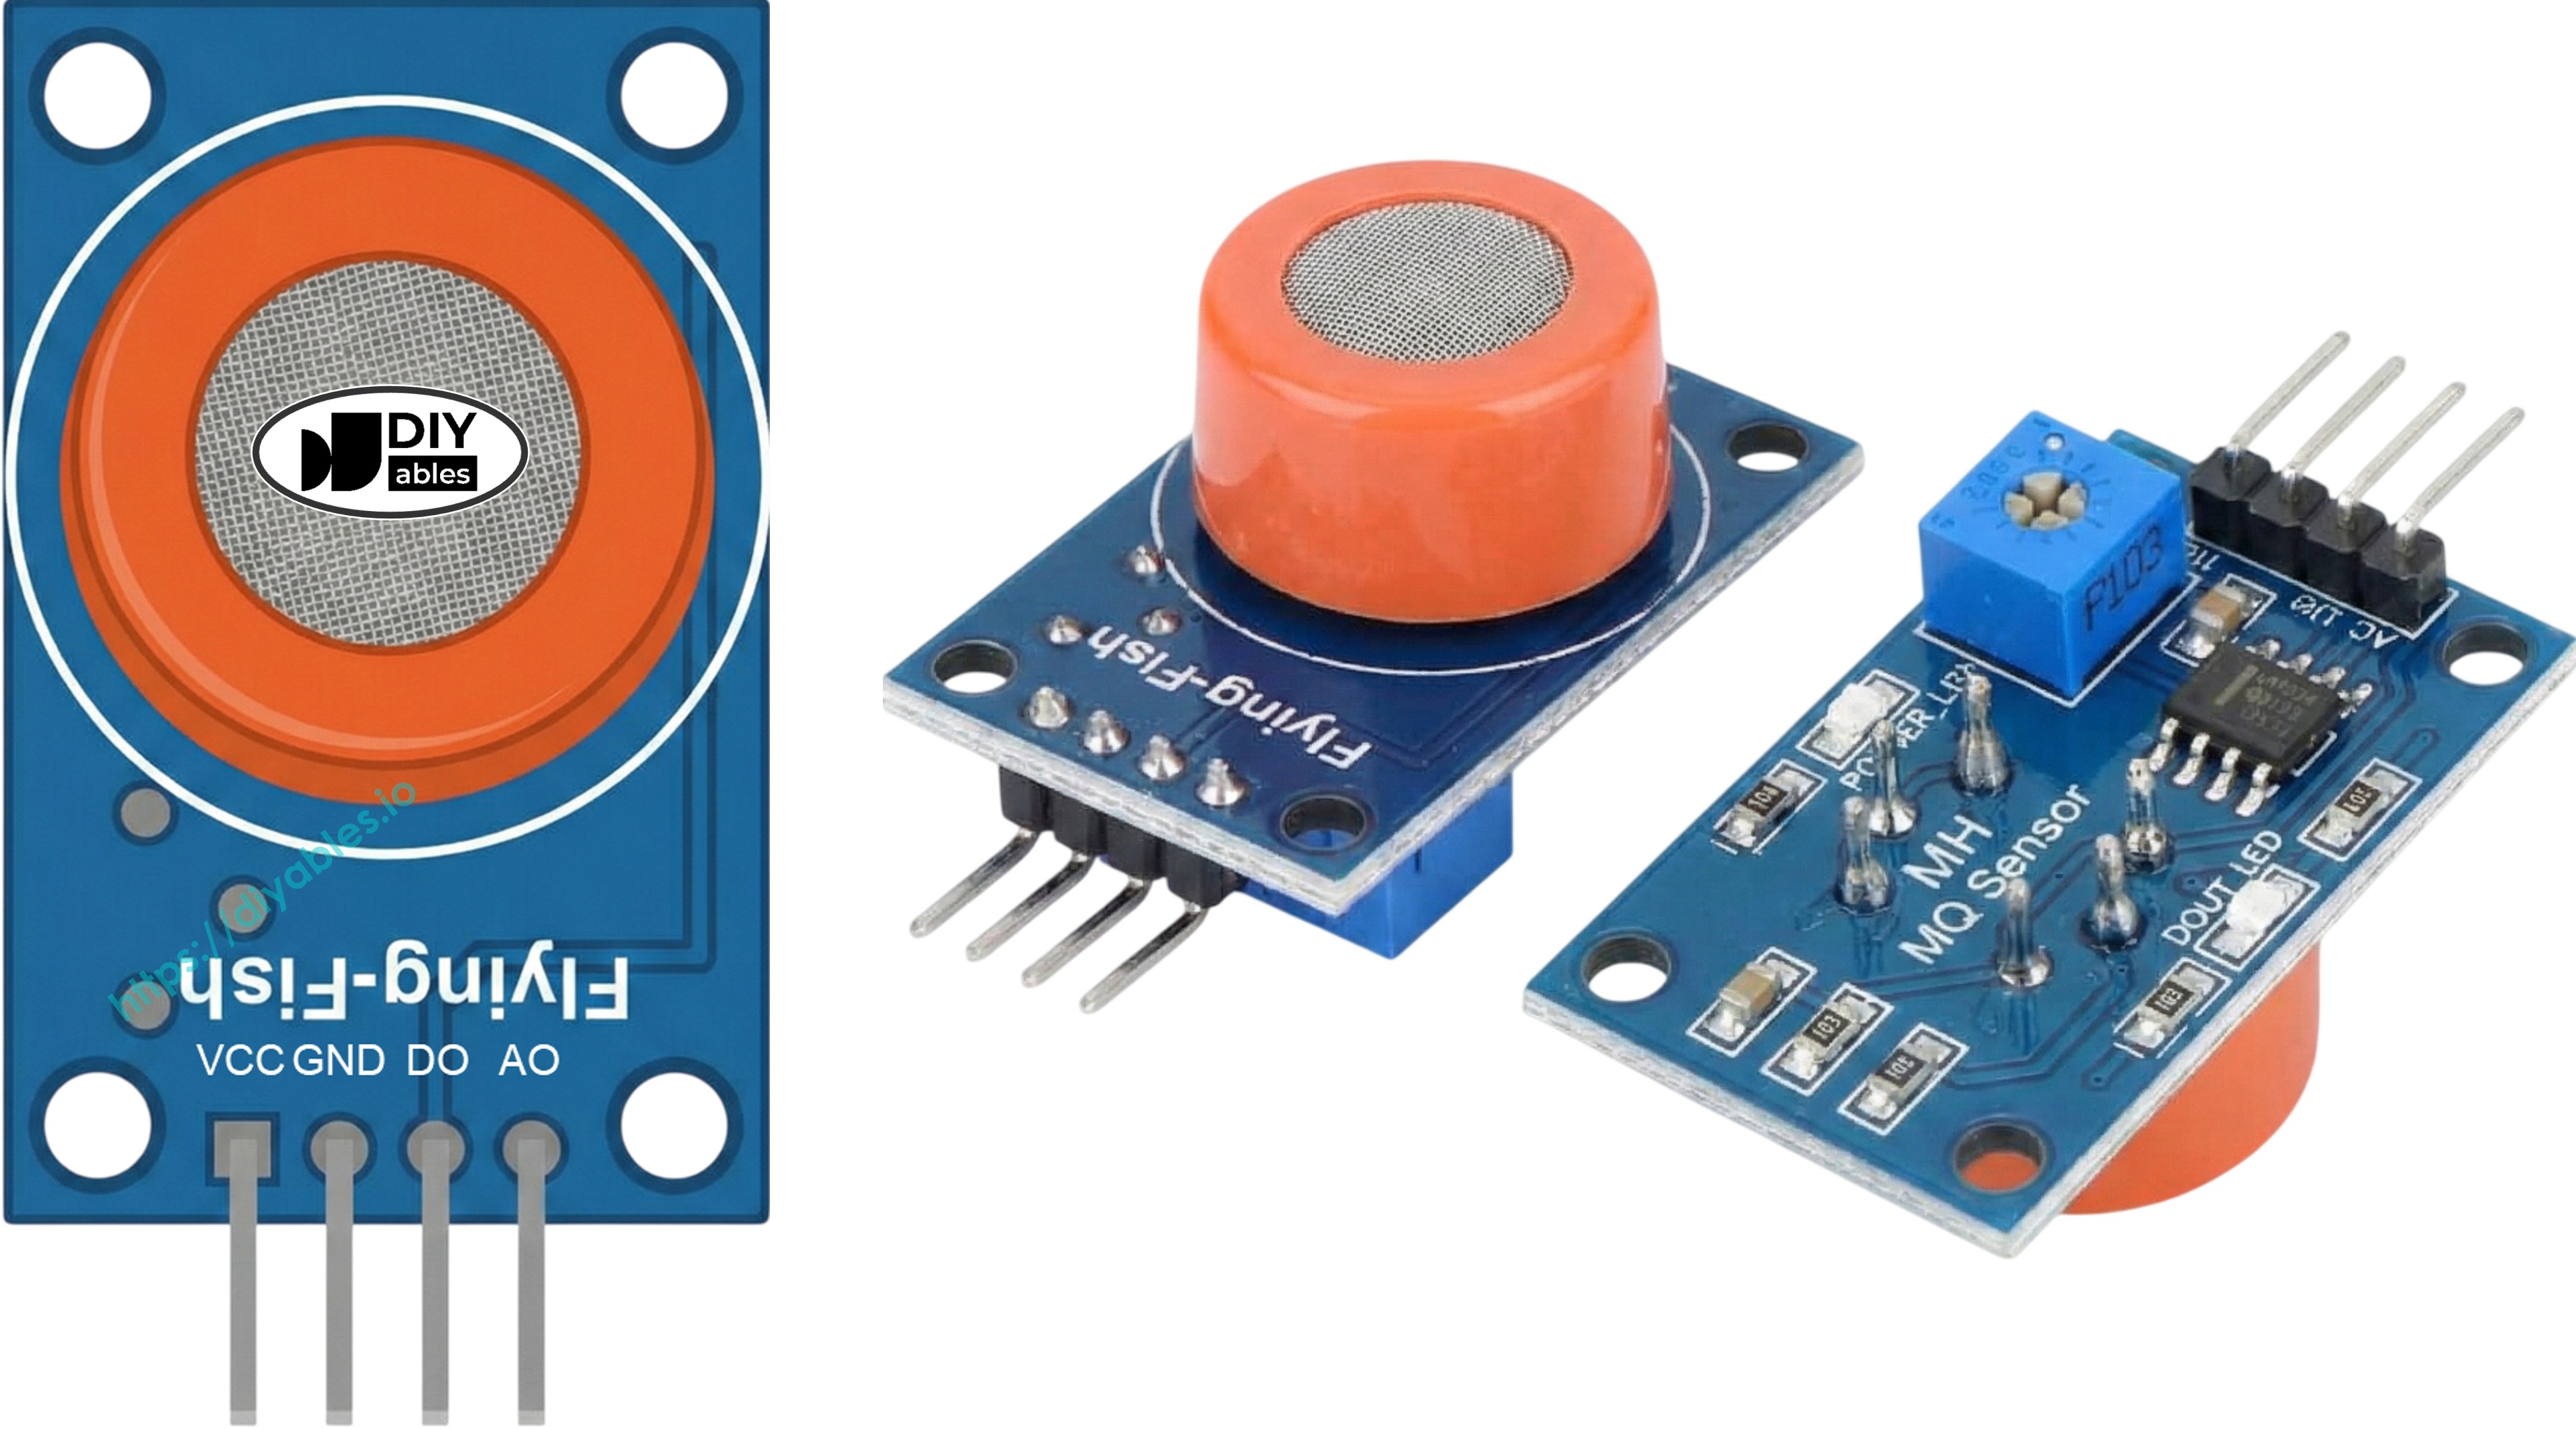
Overview of MQ3 Alcohol Sensor
Designed as a Metal Oxide Semiconductor (MOS) Chemiresistor, the MQ3 senses alcohol via resistance shifts within its active material. This sensor specializes in ethanol vapor detection with dependable sensitivity throughout its measurement range.
Its sensing component features a Tin Dioxide (SnO2) layer on an Aluminum Oxide ceramic foundation. Heating activates the SnO2 to respond to airborne alcohol molecules. A protective stainless steel mesh surrounds the element, shielding it while permitting gas access to the detection zone.
Common implementations include DIY breathalyzer construction, impairment detection systems, alcohol vapor warning devices, and atmospheric alcohol measurement.
Technical Specifications
- Operating Voltage: 5V DC
- Load Resistance: 200 KΩ
- Heater Resistance: 33Ω ± 5%
- Heating Consumption: < 800mW
- Sensing Resistance: 1 MΩ – 8 MΩ
- Detection Range: 25 – 500 ppm (parts per million)
- Preheat Time: 24-48 hours for first use
What is ppm? The ppm (parts-per-million) measurement indicates concentration ratio. With 500 ppm, you have 500 alcohol molecules per 1,000,000 total gas molecules, the remaining 999,500 being atmospheric gases.
Pinout
Four pins are present on the MQ3 sensor module:
- VCC pin: Supply +5V power here.
- GND pin: Connect to ground (0V).
- DO pin: Digital output goes LOW when alcohol exceeds threshold, HIGH when below. Adjust threshold with onboard potentiometer.
- AO pin: Analog output voltage scales with alcohol concentration. Higher alcohol yields higher voltage.
Two indicator LEDs provide visual feedback:
- PWR-LED: Illuminates when module has power.
- DO-LED: Reflects digital output—lights during detection, dark otherwise.
How It Works
The MQ3's sensing mechanism depends on Tin Dioxide (SnO2) resistance variation:
In uncontaminated air: The heated SnO2 binds oxygen molecules to its surface, capturing electrons in a depletion layer. These captured electrons establish a conduction barrier, producing high resistance.
With alcohol present: Alcohol molecules interact with surface oxygen, releasing captured electrons into the tin dioxide matrix. Released electrons enhance conductivity—greater alcohol means reduced resistance.
Two output modes are provided:
Digital Output (DO pin):
- Onboard potentiometer sets the threshold level.
- Alcohol above threshold drives DO to LOW and activates LED.
- Alcohol below threshold maintains DO at HIGH with LED off.
Analog Output (AO pin):
- Output voltage tracks alcohol concentration.
- Increased alcohol = elevated voltage.
- Decreased alcohol = reduced voltage.
- Note: Potentiometer affects only digital threshold, not analog voltage.
Warm-up and Calibration
Pre-heating Requirements
Proper MQ3 sensor operation requires adequate heating:
- First deployment or extended storage (30+ days): Maintain continuous heating for 24-48 hours to stabilize the sensor for accurate measurements.
- Regular usage: A quick 5-10 minute warm-up suffices. Early readings may be elevated but will normalize rapidly.
Warm the sensor by connecting VCC and GND to 5V and ground—use either a power supply or ESP8266's power pins.
Finding Your Threshold Values
Heated sensors like the MQ3 may drift during storage. For breathalyzer uses, establish thresholds through this calibration procedure:
- Record baseline in clean air: Operate sensor in fresh air and record analog output (typically 100-150).
- Introduce alcohol vapor: Position isopropyl alcohol or hand sanitizer near (without contacting) the sensor, allowing vapor to reach it. Note elevated readings (commonly 400-900 depending on vapor density).
- Establish detection ranges: From your measurements, define threshold zones:
- No alcohol present: Below baseline + 20 (example: < 120)
- Moderate alcohol: Mid-range values (example: 120-400)
- High alcohol: Above moderate range (example: > 400)
Critical: Individual sensors and environments yield different values. Always calibrate your specific hardware before implementation.
Setting the Digital Threshold
Adjust DO pin trigger level using the module's potentiometer:
- Expose sensor to alcohol vapor.
- Turn potentiometer clockwise until LED activates.
- Slowly rotate counterclockwise until LED just deactivates.
- Threshold is configured.
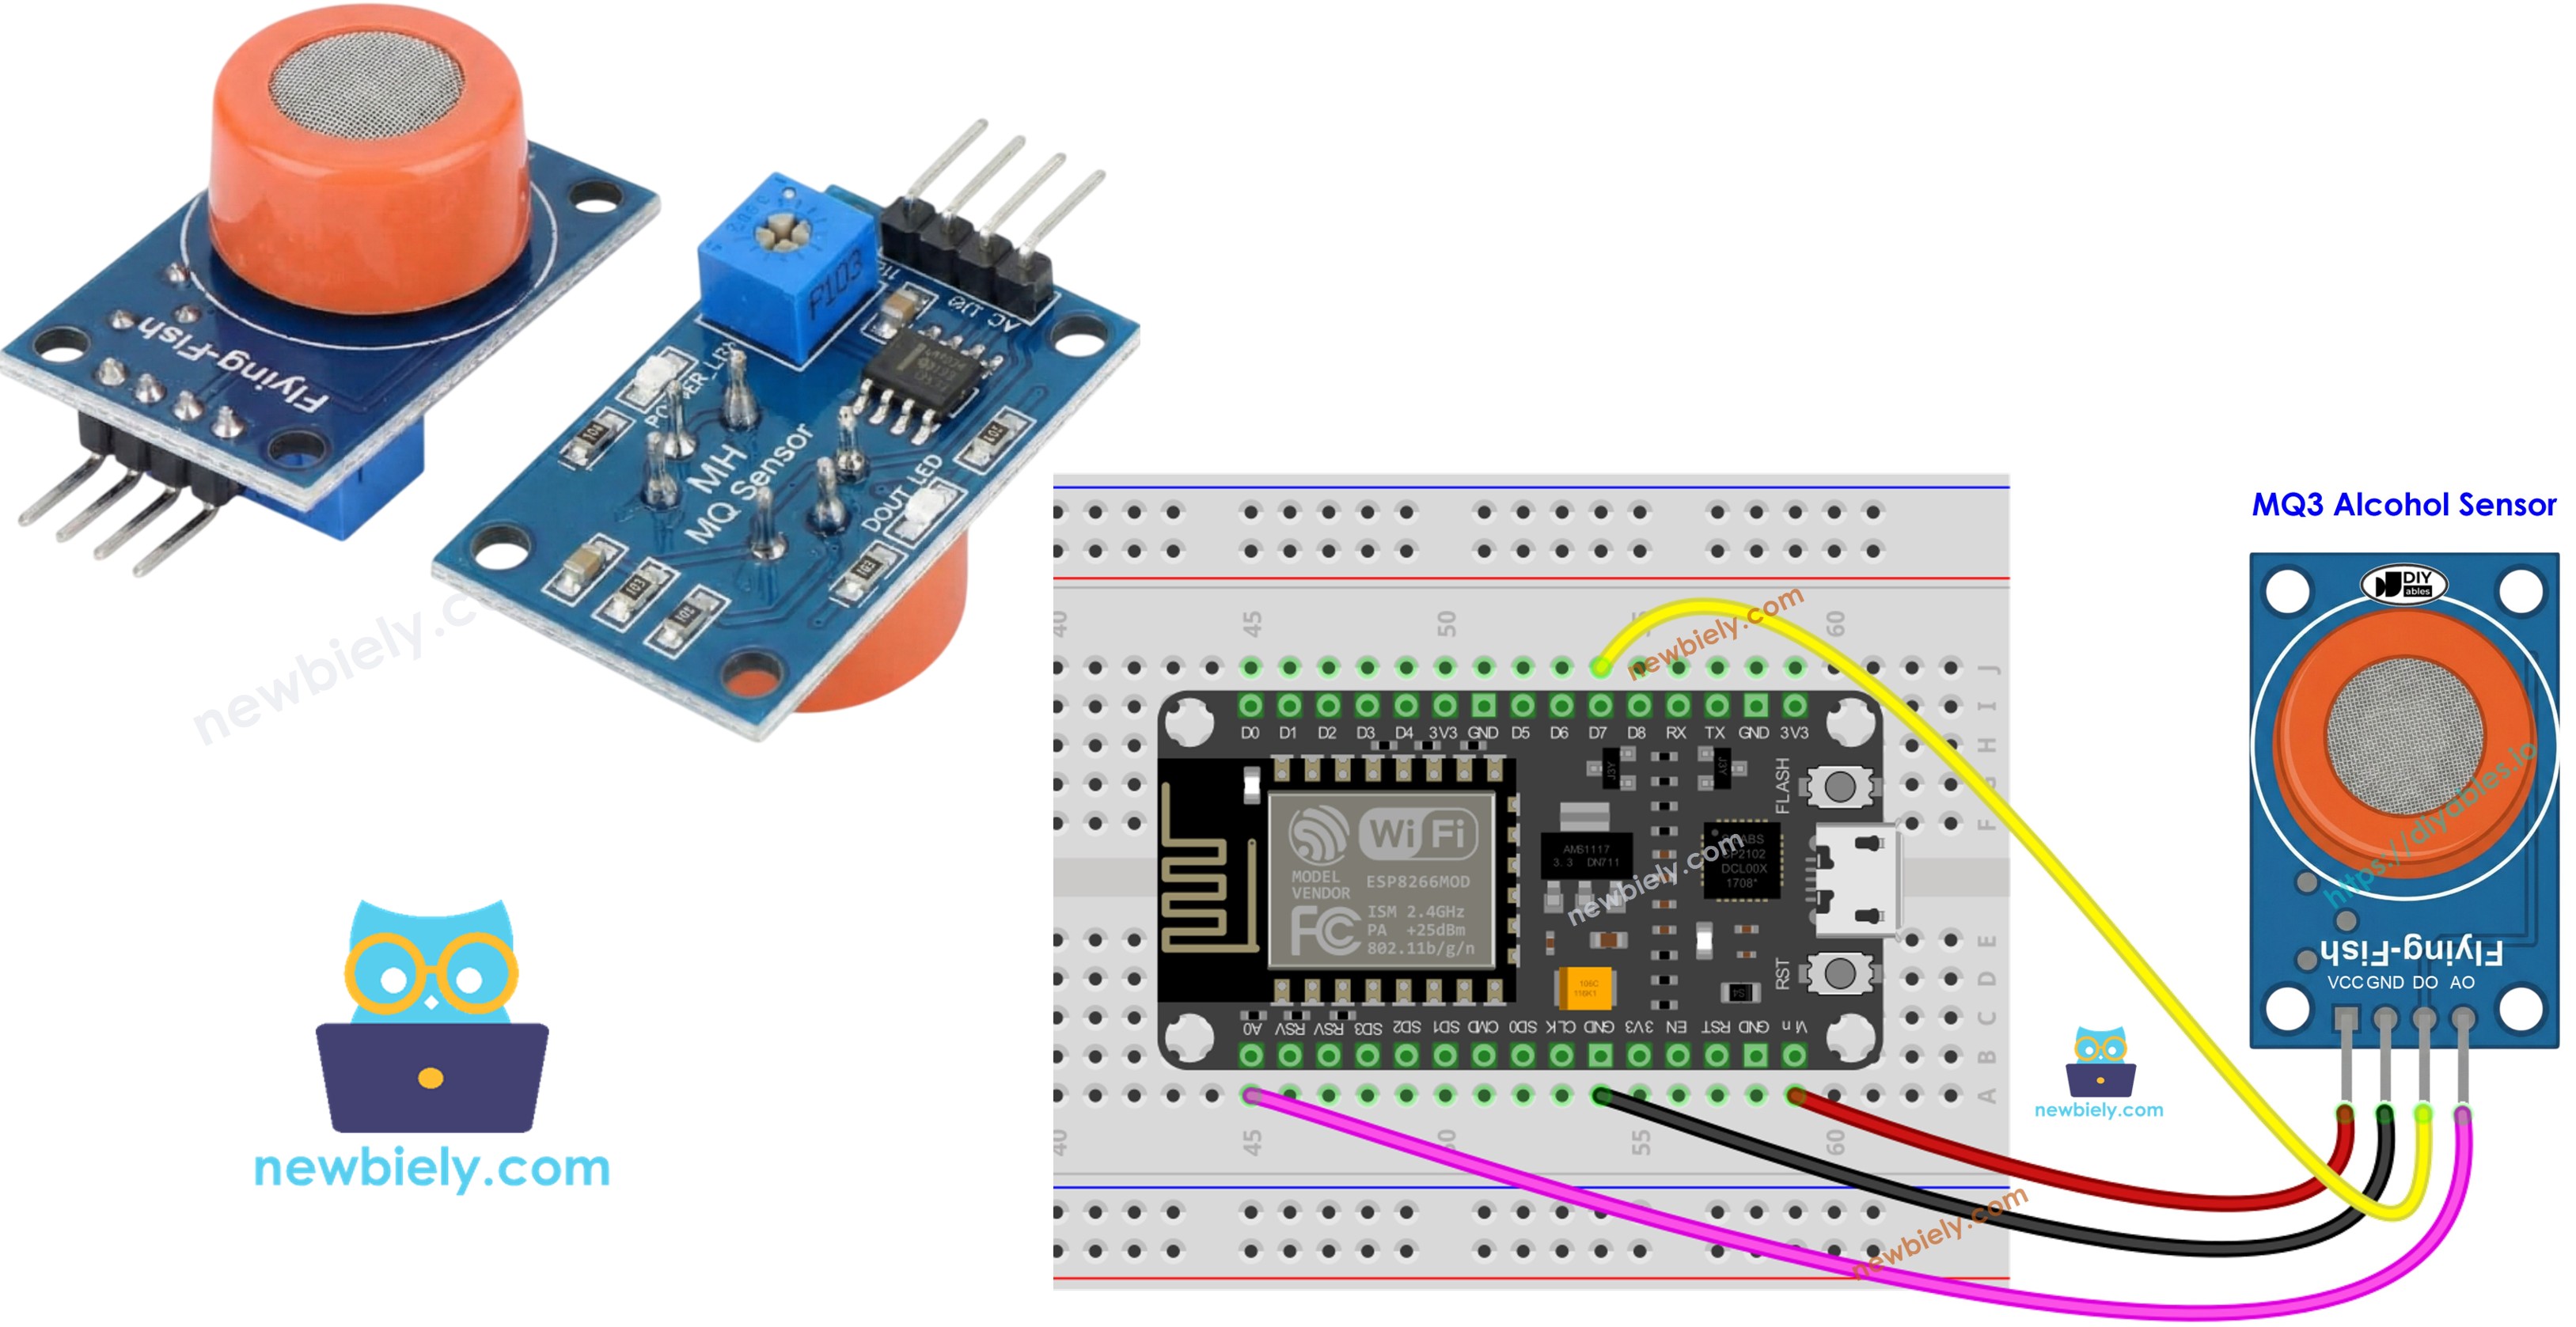
Wiring Diagram
Since the MQ3 alcohol sensor module has two outputs, you can choose to use one or both of them, depending on what you need.
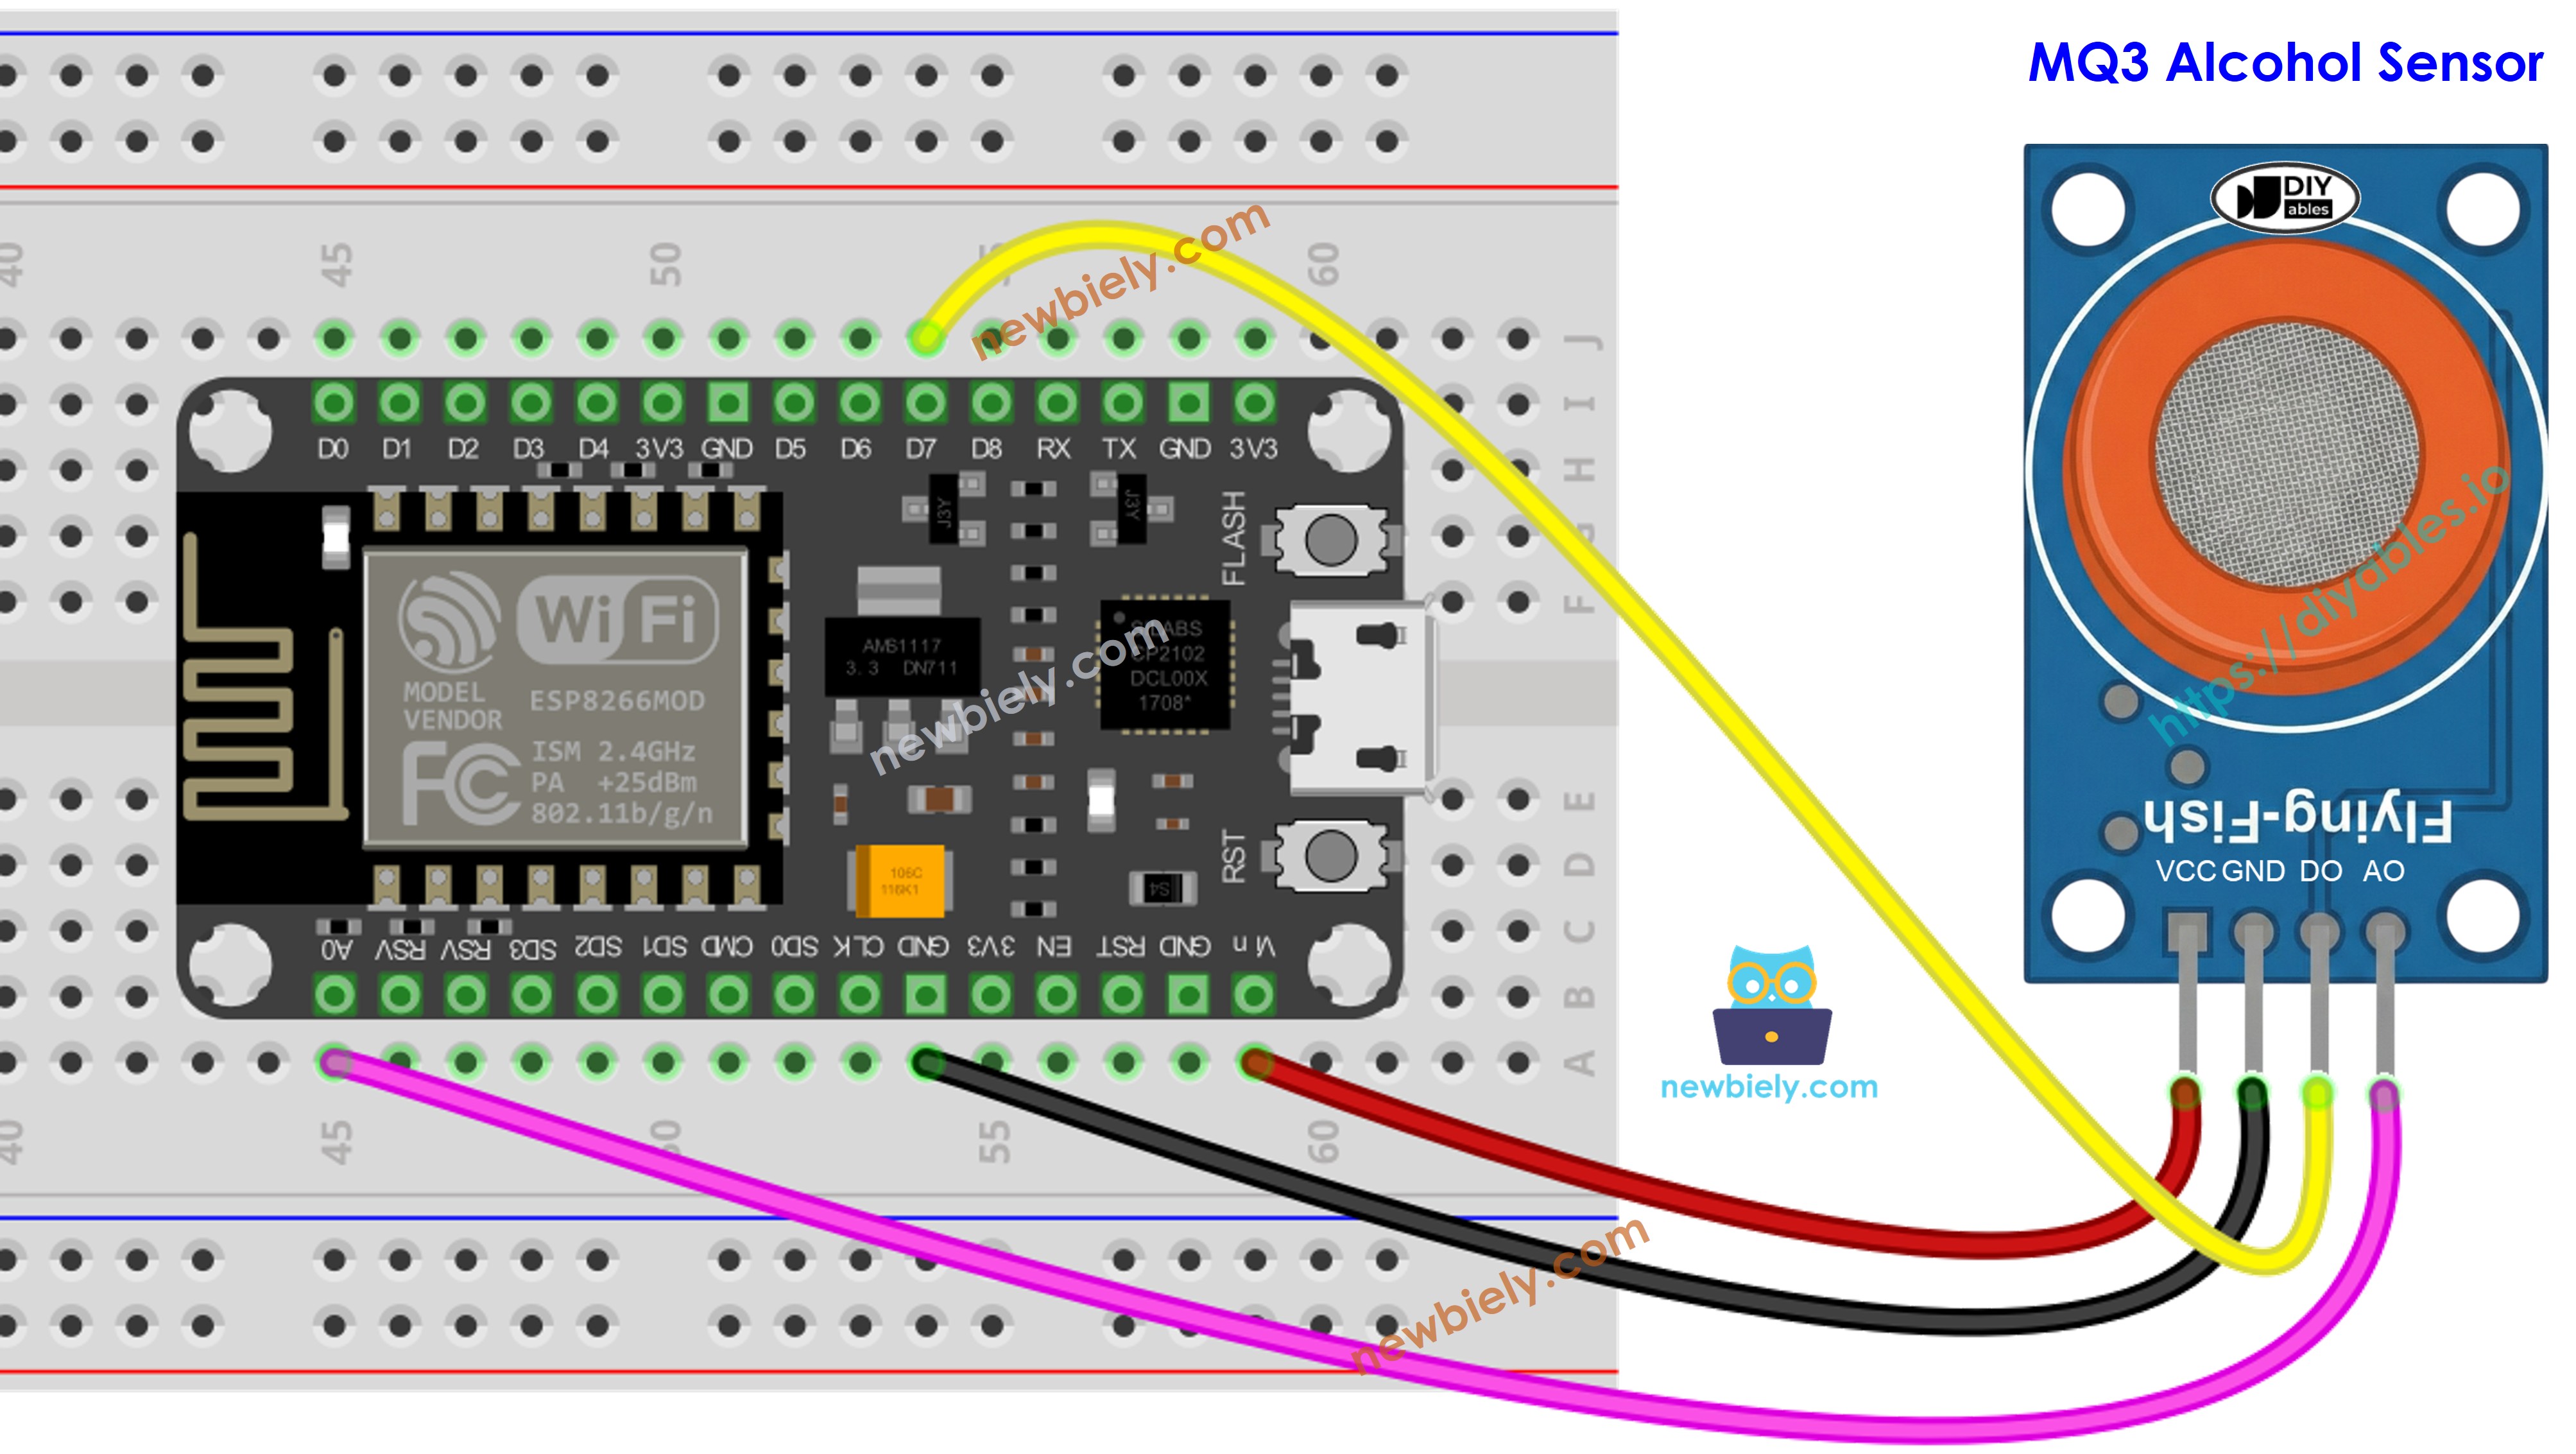
This image is created using Fritzing. Click to enlarge image
See more in ESP8266's pinout and how to supply power to the ESP8266 and other components.
ESP8266 Code - Digital Output Reading
Detailed Instructions
To get started with ESP8266 on Arduino IDE, follow these steps:
- Check out the how to setup environment for ESP8266 on Arduino IDE tutorial if this is your first time using ESP8266.
- Wire the components as shown in the diagram.
- Connect the ESP8266 board to your computer using a USB cable.
- Open Arduino IDE on your computer.
- Choose the correct ESP8266 board, such as (e.g. NodeMCU 1.0 (ESP-12E Module)), and its respective COM port.
- Copy the above code and open with Arduino IDE
- Click Upload button on Arduino IDE to upload code to ESP8266
- Place an alcohol vapor source near the MQ3 sensor (hand sanitizer or rubbing alcohol on cotton works well)
- Check out the result on the Serial Monitor.
Please keep in mind that if you notice the LED status remaining on constantly or off, you can adjust the potentiometer to fine-tune the sensitivity of the sensor.
ESP8266 Code - Analog Output Reading
Detailed Instructions
- Copy the above code and open with Arduino IDE
- Click Upload button on Arduino IDE to upload code to ESP8266
- Introduce alcohol vapor to the sensor (hand sanitizer or isopropyl alcohol vapors)
- Check out the result on the Serial Monitor.
From values read from DO or AO, you can build threshold-based logic to trigger alarms, control warning indicators, or log data for breathalyzer functionality.
ESP8266 Code - Breathalyzer with Threshold Detection
This example demonstrates using analog output with calibrated thresholds to estimate intoxication levels.
Detailed Instructions
- Critical: First calibrate your sensor using the analog reading example to determine appropriate threshold values for your environment.
- Update SOBER_THRESHOLD and DRUNK_THRESHOLD constants in the code with your calibrated numbers.
- Copy the above code and open with Arduino IDE
- Click Upload button on Arduino IDE to upload code to ESP8266
- Test with alcohol vapor (isopropyl alcohol or hand sanitizer vapor)
- Check out the result on the Serial Monitor.
Disclaimer: This project serves educational purposes exclusively. Never rely on this device for legal breathalyzer functions or driving safety assessments.
※ NOTE THAT:
This tutorial uses the analogRead() function to get data from an ADC (Analog-to-Digital Converter) that's connected to a sensor or another part. The ESP8266's ADC works well for projects where you don't need very precise readings. But remember, the ESP8266's ADC isn't very accurate for detailed measurements. If your project needs to be very precise, you might want to use a separate ADC like the ADS1115 with the ESP8266, or use Arduino like the Arduino Uno R4 WiFi, which has a more reliable ADC.