ESP8266 - Mini Mp3 Player Module
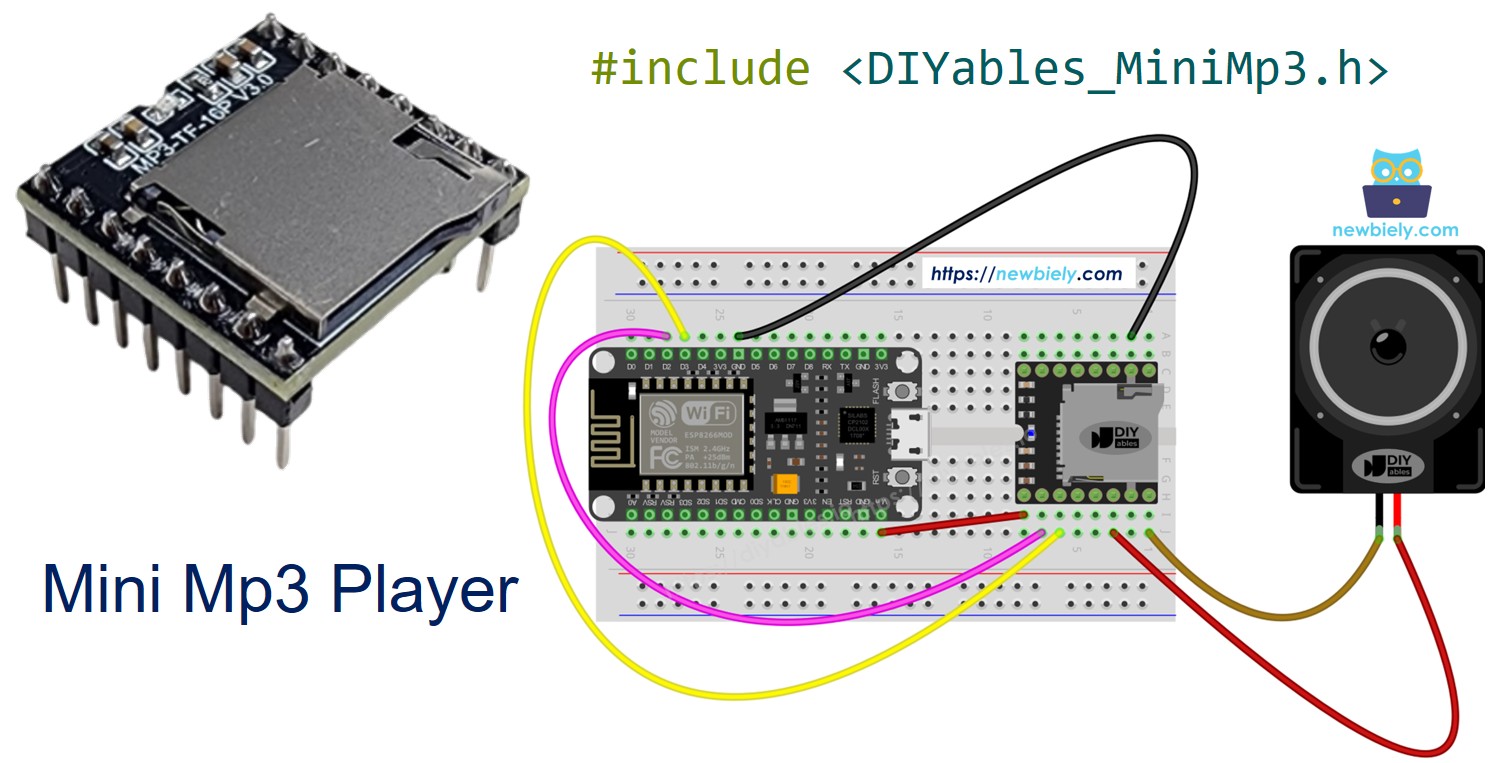
The ESP8266 (NodeMCU, Wemos D1 Mini, and similar boards) is a popular WiFi-enabled microcontroller running at 3.3V. Pairing it with the DIYables Mini Mp3 Player module gives you a WiFi-capable audio device using just a few wires and a micro SD card.
In this tutorial, you will:
Wire the Mini Mp3 Player to the ESP8266 — no resistor needed.
Format the SD card and name files correctly.
Program the ESP8266 to play, pause, resume, and stop mp3 tracks.
Add volume control via buttons.
Set up looping, shuffling, and folder-based playback.
Query the module for track info and volume.
Or you can buy the following kits:
Disclosure: Some of the links provided in this section are Amazon affiliate links. We may receive a commission for any purchases made through these links at no additional cost to you.
Additionally, some of these links are for products from our own brand,
DIYables .
No resistor is needed. The ESP8266 uses 3.3V logic — a perfect match for the module.
The DIYables Mini Mp3 Player module encapsulates the YX5200-24SS mp3 decoder chip. It reads mp3 files from a micro SD card and outputs audio through an onboard amplifier (3W speaker max) or DAC pins for external amplification.
You control it through UART at 9600 baud. The feature set includes:
Play, pause, resume, stop, next, previous
Volume control: 0 to 30
6 EQ presets (Normal, Pop, Rock, Jazz, Classic, Bass)
Loop one track, loop a folder, loop all, or shuffle
Play from numbered folders
Advertisement interrupts
Status readbacks (current track, volume, play state)
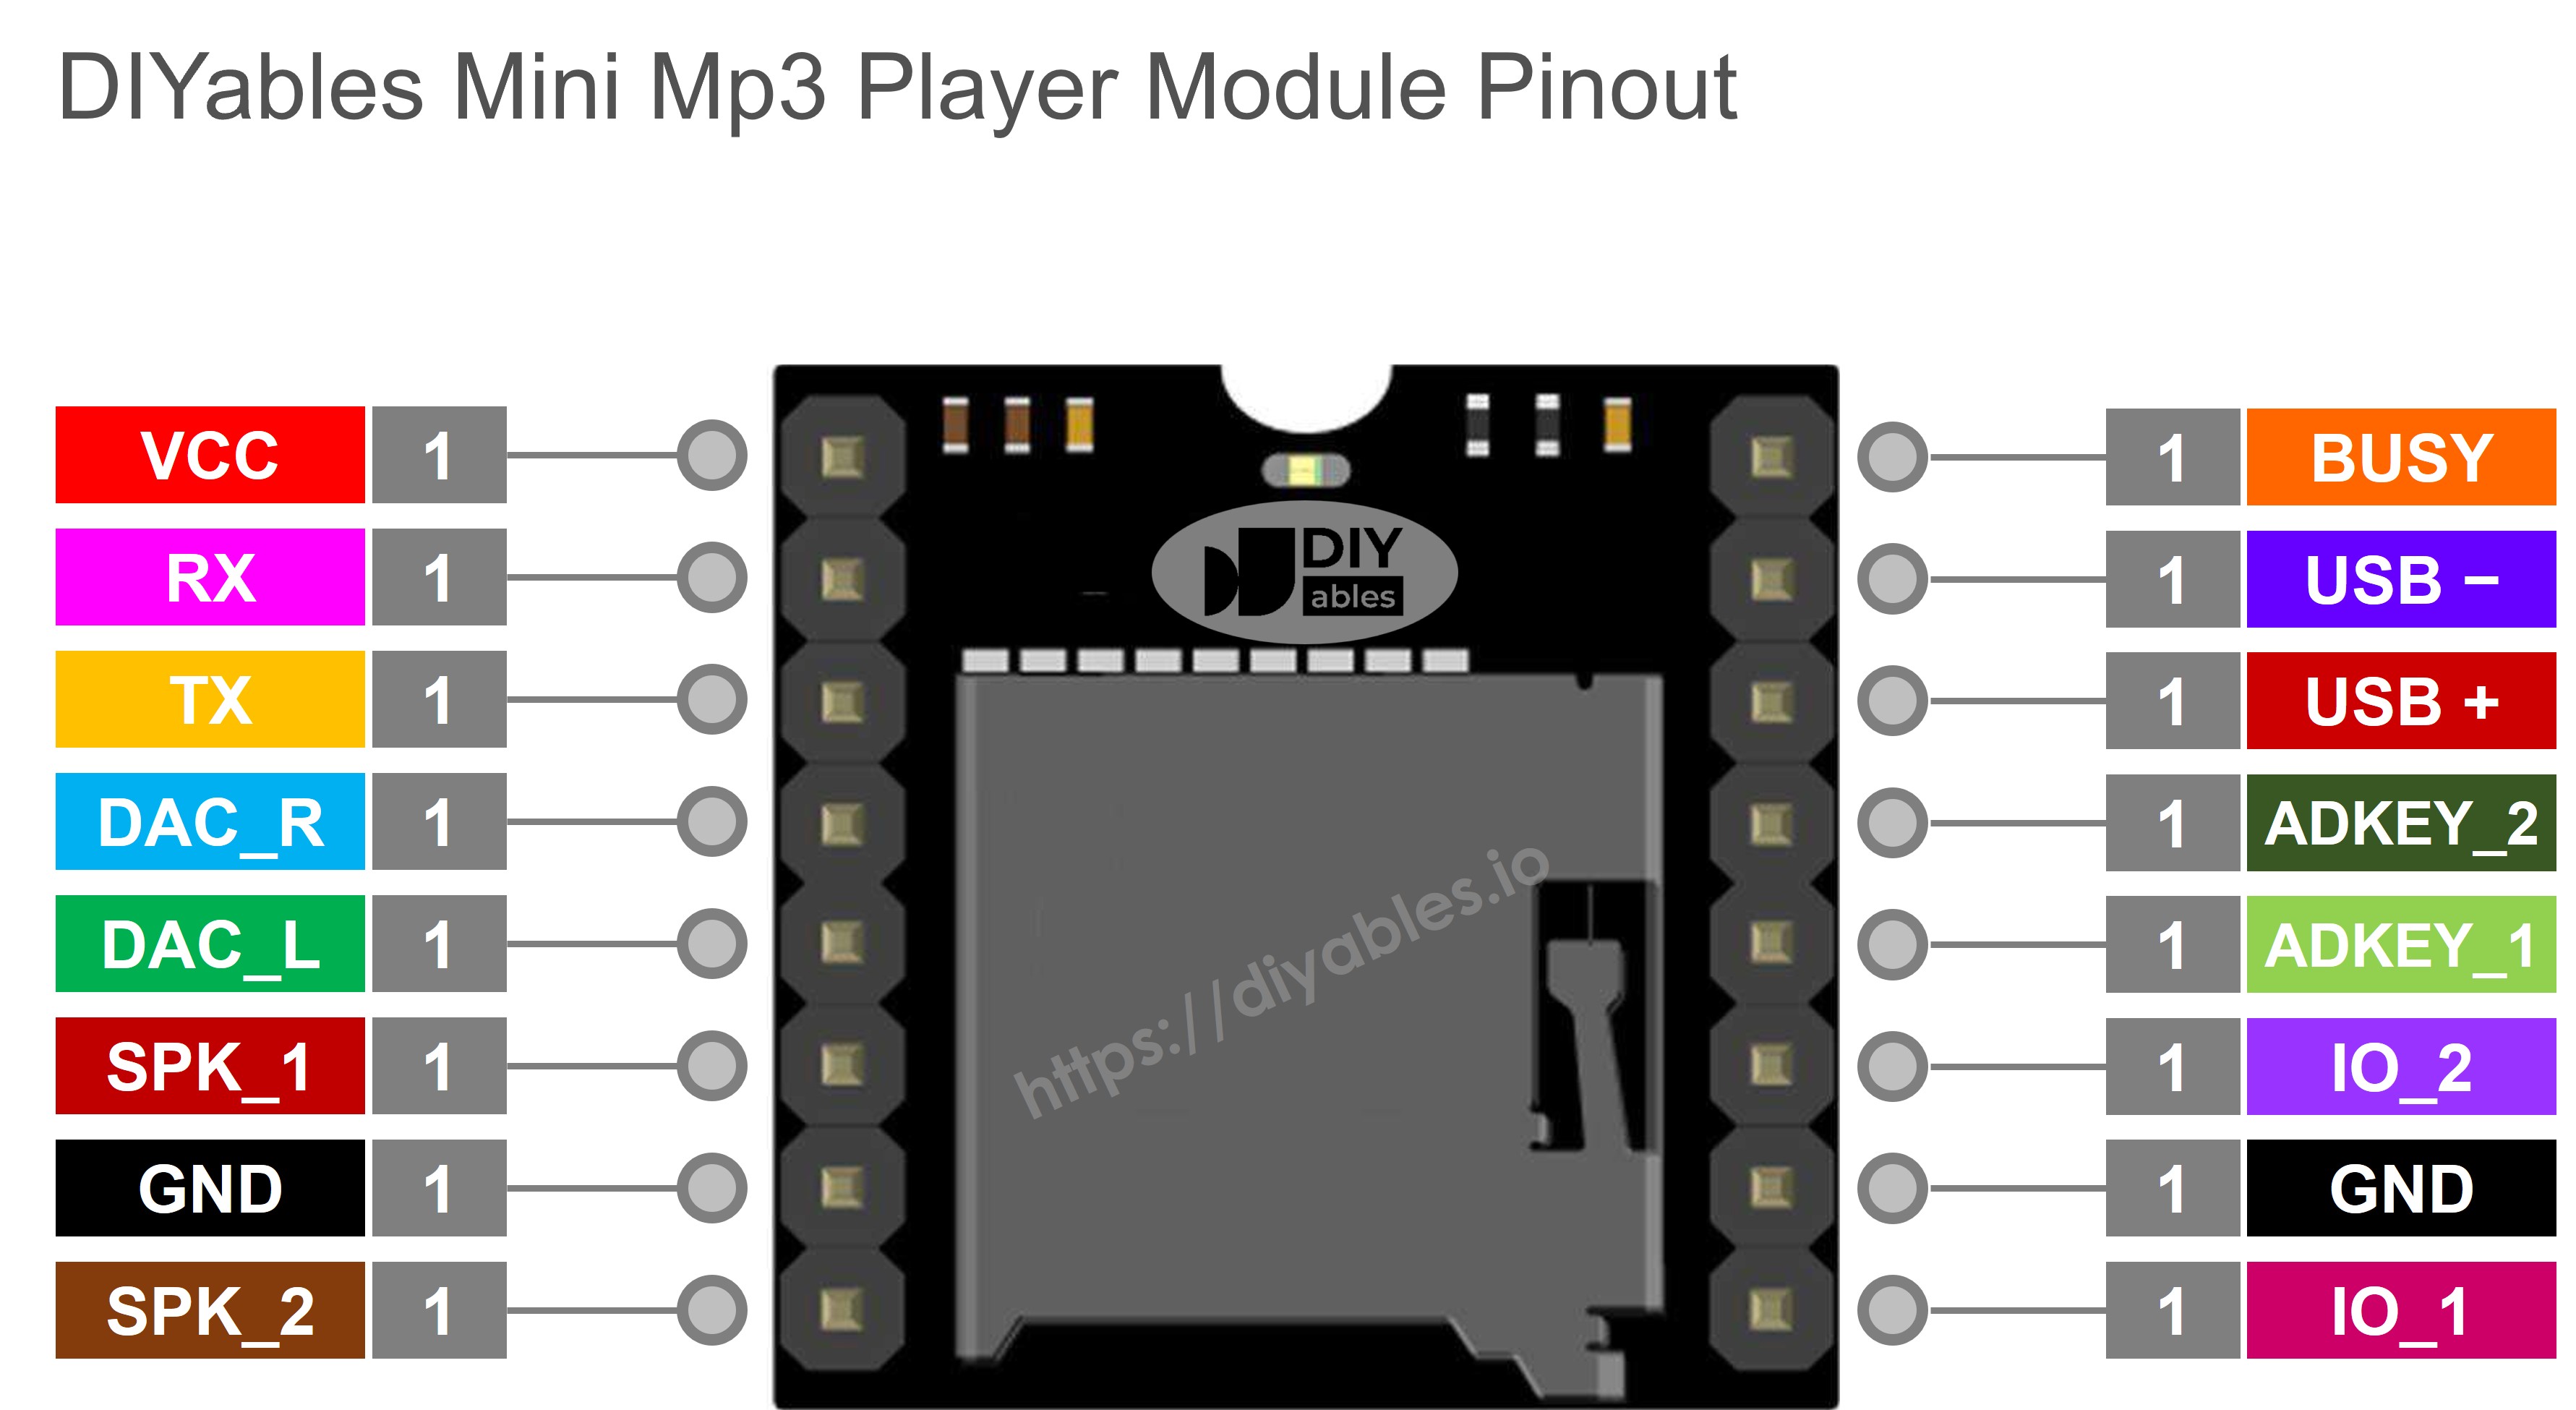
| Pin | Description |
|---|
| VCC | 3.2V – 5.0V power |
| GND | Ground |
| RX | Serial input from ESP8266 TX |
| TX | Serial output to ESP8266 RX |
| SPK_1 | Speaker + (onboard amp, 3W max) |
| SPK_2 | Speaker − |
| DAC_R | Right line-level output |
| DAC_L | Left line-level output |
| BUSY | LOW while playing |
| IO_1 | Short press = prev, long press = vol− |
| IO_2 | Short press = next, long press = vol+ |
The ESP8266 has only one hardware UART which is used by the USB-Serial bridge. For the mp3 module, we use SoftwareSerial on two available GPIO pins.
| Mini Mp3 Player | ESP8266 (NodeMCU) | Notes |
|---|
| VCC | 3.3V | |
| GND | GND | |
| RX | D7 (GPIO 13) | No resistor — already 3.3V |
| TX | D5 (GPIO 14) | |
| SPK_1 | Speaker + | |
| SPK_2 | Speaker − | |
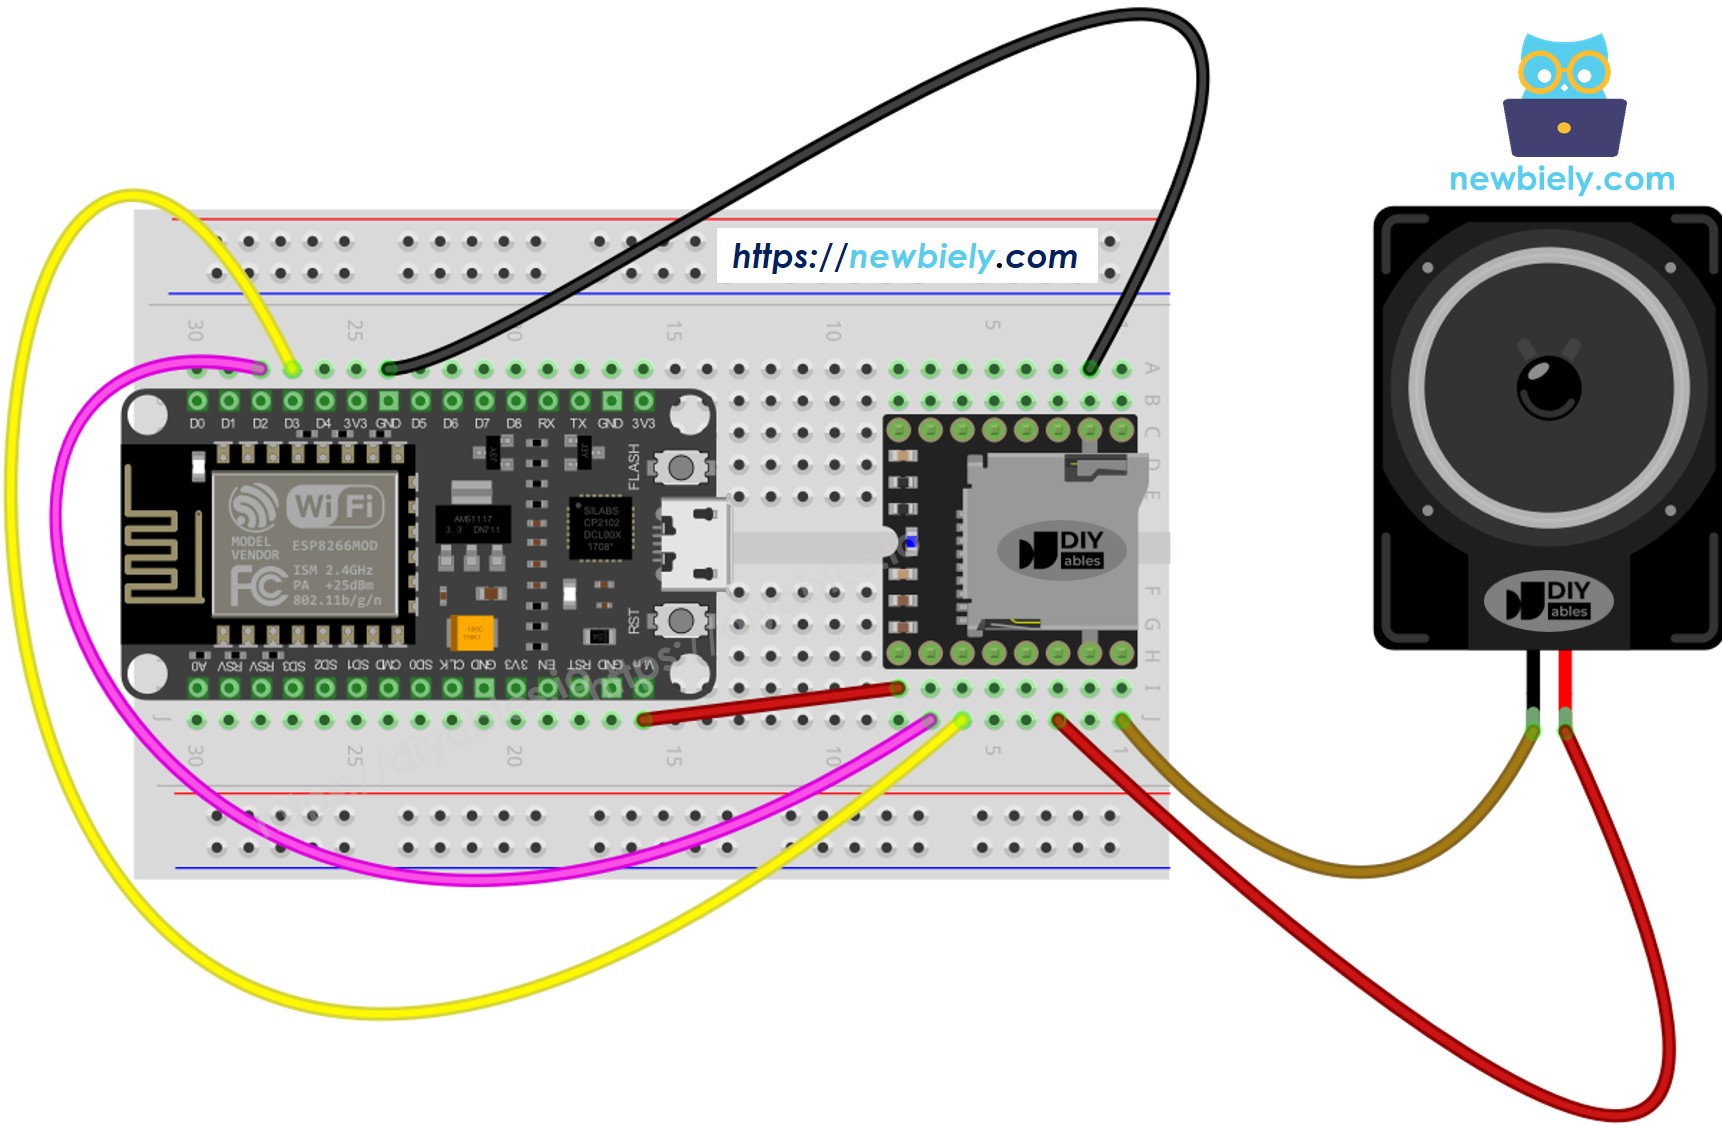
This image is created using Fritzing. Click to enlarge image
See more in ESP8266's pinout and how to supply power to the ESP8266 and other components.
Avoid GPIO 0, 2, and 15 for the mp3 serial lines — those pins affect boot behavior. D5 and D7 are safe general-purpose pins.
Format as FAT16 or FAT32.
Add mp3 files with zero-padded names:
/001.mp3
/002.mp3
/003.mp3
For folders:
/01/001.mp3
/01/002.mp3
/02/001.mp3
Things to remember:
Numbering starts at 1, not 0.
Track order depends on the copy sequence, not filenames. Format first, then copy files one by one.
Folders: 01–99. Files in folders: 001–255.
Plug the ESP8266 into your computer via USB.
In the Arduino IDE, select your board (e.g., NodeMCU 1.0) and port.
Go to Libraries in the sidebar.
Search "DIYables_MiniMp3" and install it.
No other libraries are needed.
#include <DIYables_MiniMp3.h>
#include <SoftwareSerial.h>
SoftwareSerial mp3Serial(D5, D7);
DIYables_MiniMp3 mp3;
void setup() {
Serial.begin(115200);
mp3Serial.begin(9600);
mp3.begin(mp3Serial);
delay(1000);
mp3.setVolume(25);
}
void loop() {
}
The ESP8266 SoftwareSerial library works reliably at 9600 baud. Always call delay(1000) after begin() to let the module initialize.
#include <DIYables_MiniMp3.h>
#include <SoftwareSerial.h>
SoftwareSerial mp3Serial(D3, D2);
DIYables_MiniMp3 mp3;
void setup()
{
Serial.begin(9600);
mp3Serial.begin(9600);
mp3.begin(mp3Serial);
delay(1000);
mp3.setVolume(25);
Serial.println("Playing track 1...");
mp3.play(1);
}
void loop()
{
}
Prepare the SD card, insert it, and wire the module as shown.
Open the Arduino IDE, select your ESP8266 board, and upload.
Track 001.mp3 plays immediately.
| Function | Explanation | Code |
|---|
| play(n) | Start track n | mp3.play(1) |
| playNext() | Skip forward | mp3.playNext() |
| playPrevious() | Skip backward | mp3.playPrevious() |
| pause() | Pause output | mp3.pause() |
| resume() | Continue paused track | mp3.resume() |
| stop() | End playback | mp3.stop() |
#include <DIYables_MiniMp3.h>
#include <SoftwareSerial.h>
SoftwareSerial mp3Serial(D3, D2);
DIYables_MiniMp3 mp3;
int currentTrack = 1;
int totalTracks = 3;
unsigned long lastTrackTime = 0;
unsigned long trackDuration = 5000;
void setup()
{
Serial.begin(9600);
mp3Serial.begin(9600);
mp3.begin(mp3Serial);
delay(1000);
mp3.setVolume(20);
Serial.println("Playing track 1...");
mp3.play(currentTrack);
lastTrackTime = millis();
}
void loop()
{
if (millis() - lastTrackTime >= trackDuration)
{
currentTrack++;
if (currentTrack > totalTracks)
currentTrack = 1;
Serial.print("Playing track ");
Serial.println(currentTrack);
mp3.play(currentTrack);
lastTrackTime = millis();
}
}
#include <DIYables_MiniMp3.h>
#include <SoftwareSerial.h>
SoftwareSerial mp3Serial(D3, D2);
DIYables_MiniMp3 mp3;
const int BUTTON_VOL_UP = D5;
const int BUTTON_VOL_DOWN = D6;
int volume = 15;
void setup()
{
Serial.begin(9600);
mp3Serial.begin(9600);
pinMode(BUTTON_VOL_UP, INPUT_PULLUP);
pinMode(BUTTON_VOL_DOWN, INPUT_PULLUP);
mp3.begin(mp3Serial);
delay(1000);
mp3.setVolume(volume);
mp3.loopTrack(1);
Serial.print("Volume: ");
Serial.println(volume);
}
void loop()
{
if (digitalRead(BUTTON_VOL_UP) == LOW)
{
if (volume < 30)
{
volume++;
mp3.setVolume(volume);
Serial.print("Volume: ");
Serial.println(volume);
}
delay(200);
}
if (digitalRead(BUTTON_VOL_DOWN) == LOW)
{
if (volume > 0)
{
volume--;
mp3.setVolume(volume);
Serial.print("Volume: ");
Serial.println(volume);
}
delay(200);
}
}
| Function | What It Does | Code |
|---|
| setVolume(v) | Set to a specific level | mp3.setVolume(20) |
| volumeUp() | Increase by one | mp3.volumeUp() |
| volumeDown() | Decrease by one | mp3.volumeDown() |
| getVolume() | Read current volume | mp3.getVolume() |
#include <DIYables_MiniMp3.h>
#include <SoftwareSerial.h>
SoftwareSerial mp3Serial(D3, D2);
DIYables_MiniMp3 mp3;
const int BUTTON_NEXT = D5;
const int BUTTON_PREV = D6;
void setup()
{
Serial.begin(9600);
mp3Serial.begin(9600);
pinMode(BUTTON_NEXT, INPUT_PULLUP);
pinMode(BUTTON_PREV, INPUT_PULLUP);
mp3.begin(mp3Serial);
delay(1000);
mp3.setVolume(20);
mp3.play(1);
Serial.println("Press NEXT or PREV button to change track");
}
void loop()
{
if (digitalRead(BUTTON_NEXT) == LOW)
{
Serial.println("Next track");
mp3.playNext();
delay(300);
}
if (digitalRead(BUTTON_PREV) == LOW)
{
Serial.println("Previous track");
mp3.playPrevious();
delay(300);
}
}
#include <DIYables_MiniMp3.h>
#include <SoftwareSerial.h>
SoftwareSerial mp3Serial(D3, D2);
DIYables_MiniMp3 mp3;
const int BUTTON_PIN = D5;
bool paused = false;
void setup()
{
Serial.begin(9600);
mp3Serial.begin(9600);
pinMode(BUTTON_PIN, INPUT_PULLUP);
mp3.begin(mp3Serial);
delay(1000);
mp3.setVolume(20);
mp3.play(1);
Serial.println("Playing. Press button to pause/resume.");
}
void loop()
{
if (digitalRead(BUTTON_PIN) == LOW)
{
if (paused)
{
mp3.resume();
Serial.println("Resumed");
}
else
{
mp3.pause();
Serial.println("Paused");
}
paused = !paused;
delay(300);
}
}
#include <DIYables_MiniMp3.h>
#include <SoftwareSerial.h>
SoftwareSerial mp3Serial(D3, D2);
DIYables_MiniMp3 mp3;
void setup()
{
Serial.begin(9600);
mp3Serial.begin(9600);
mp3.begin(mp3Serial);
delay(1000);
mp3.setVolume(25);
mp3.setEQ(DIYables_MiniMp3::EQ_NORMAL);
Serial.println("Playing track 1 on loop...");
mp3.loopTrack(1);
}
void loop()
{
}
| Function | Behavior | Code |
|---|
| loopTrack(n) | Repeat one track | mp3.loopTrack(1) |
| loopFolder(f) | Repeat folder contents | mp3.loopFolder(1) |
| loopAll() | Repeat everything | mp3.loopAll() |
| stopLoop() | Cancel looping | mp3.stopLoop() |
| shuffle() | Random order | mp3.shuffle() |
#include <DIYables_MiniMp3.h>
#include <SoftwareSerial.h>
SoftwareSerial mp3Serial(D3, D2);
DIYables_MiniMp3 mp3;
void setup()
{
Serial.begin(9600);
mp3Serial.begin(9600);
mp3.begin(mp3Serial);
delay(1000);
mp3.setVolume(20);
Serial.println("Playing folder 01, track 001...");
mp3.playFolder(1, 1);
delay(5000);
Serial.println("Playing folder 01, track 002...");
mp3.playFolder(1, 2);
delay(5000);
Serial.println("Playing folder 02, track 001...");
mp3.playFolder(2, 1);
}
void loop()
{
}
| Function | Usage | Code |
|---|
| playFolder(f, t) | Folder f, track t | mp3.playFolder(1, 1) |
| playLargeFolder(f, t) | Large folder mode | mp3.playLargeFolder(1, 500) |
| playFromMP3Folder(t) | /mp3 folder | mp3.playFromMP3Folder(1) |
#include <DIYables_MiniMp3.h>
#include <SoftwareSerial.h>
SoftwareSerial mp3Serial(D3, D2);
DIYables_MiniMp3 mp3;
void setup()
{
Serial.begin(9600);
mp3Serial.begin(9600);
mp3.begin(mp3Serial);
delay(1000);
mp3.setVolume(20);
Serial.println("=== DIYables Mini Mp3 Player ===");
Serial.println("Commands:");
Serial.println(" 1-9 Play track number");
Serial.println(" + Volume up");
Serial.println(" - Volume down");
Serial.println(" p Pause");
Serial.println(" r Resume");
Serial.println(" s Stop");
Serial.println(" n Next track");
Serial.println(" b Previous track");
Serial.println(" ? Show status");
Serial.println("================================");
}
void loop()
{
if (Serial.available())
{
char cmd = Serial.read();
switch (cmd)
{
case '1': case '2': case '3':
case '4': case '5': case '6':
case '7': case '8': case '9':
Serial.print("Playing track ");
Serial.println(cmd - '0');
mp3.play(cmd - '0');
break;
case '+':
Serial.println("Volume up");
mp3.volumeUp();
break;
case '-':
Serial.println("Volume down");
mp3.volumeDown();
break;
case 'p':
Serial.println("Paused");
mp3.pause();
break;
case 'r':
Serial.println("Resumed");
mp3.resume();
break;
case 's':
Serial.println("Stopped");
mp3.stop();
break;
case 'n':
Serial.println("Next track");
mp3.playNext();
break;
case 'b':
Serial.println("Previous track");
mp3.playPrevious();
break;
case '?':
{
Serial.println("--- Status ---");
int16_t vol = mp3.getVolume();
Serial.print("Volume: ");
Serial.println(vol);
int16_t track = mp3.getCurrentTrack();
Serial.print("Current track: ");
Serial.println(track);
bool playing = mp3.isPlaying();
Serial.print("Playing: ");
Serial.println(playing ? "Yes" : "No");
int16_t total = mp3.getTrackCount();
Serial.print("Total tracks: ");
Serial.println(total);
Serial.println("--------------");
break;
}
default:
break;
}
}
}
| Constant | Value | Sound Profile |
|---|
| DIYables_MiniMp3::EQ_NORMAL | 0 | Flat |
| DIYables_MiniMp3::EQ_POP | 1 | Pop |
| DIYables_MiniMp3::EQ_ROCK | 2 | Rock |
| DIYables_MiniMp3::EQ_JAZZ | 3 | Jazz |
| DIYables_MiniMp3::EQ_CLASSIC | 4 | Classic |
| DIYables_MiniMp3::EQ_BASS | 5 | Bass heavy |
mp3.setEQ(DIYables_MiniMp3::EQ_NORMAL);
Each query is blocking (up to 100 ms). Returns −1 on failure.
| Function | Returns | Meaning |
|---|
| isPlaying() | bool | true = audio active |
| getVolume() | int16_t | 0–30 |
| getEQ() | int16_t | 0–5 |
| getTrackCount() | int16_t | All tracks on card |
| getCurrentTrack() | int16_t | Active track number |
| getFolderCount() | int16_t | Folder count |
| getTrackCountInFolder(f) | int16_t | Tracks in folder f |